Issue: There are two methods to update the firmware of Smart-UPS SRC models:
If a previous version of the Firmware Upgrade Wizard or Firmware Images are installed, delete the old version and download the version attached to this article.
The download links for the necessary files can be found at the end of this document.
Product Line: SRC5KUXI, SRCE6KUXI, SRC6KUXICH, SRC10KUXI, SRC10KUXICH
Environment:
The system requirements for the Firmware Upgrade Wizard v4.3.1.1_SRC are as follows:
Operating systems: 64-bit Microsoft Windows 7, Windows 2016, Windows 8.1, Windows 10
To find the current UPS Firmware version via the UPS LCD display:
The Firmware Upgrade Wizard will detect the current version.
Alternately, from the main menu of the UPS LCD screen, select "About" and scroll down to "UPS Firmware".
To find the current UPS Firmware version via Firmware Upgrade Wizard:
Run the Firmware Upgrade Wizard and it will identify the current firmware version before performing the update.
To find the current UPS ID:
Every Smart-UPS has a unique UPS ID. This can be found in the "About" menu on the UPS LCD screen, or in the NMC web interface.
Resolution:
UPS Firmware Update Instructions
IMPORTANT:

UPS Firmware Update using the Firmware Upgrade Wizard:
Step 1A: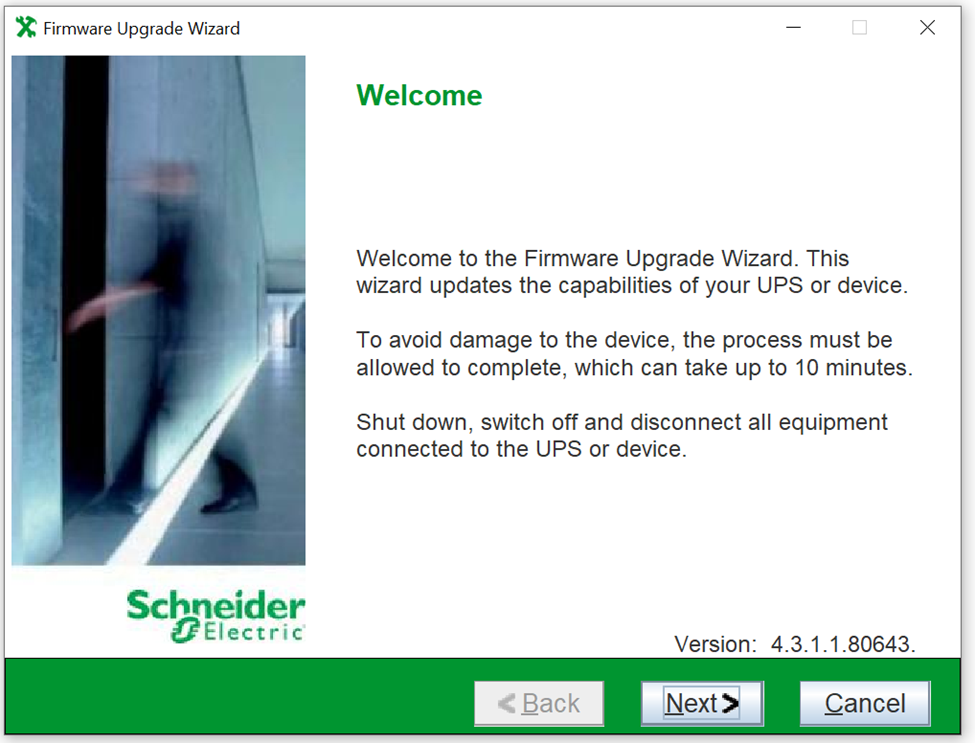
Step 3A:
Step 4A: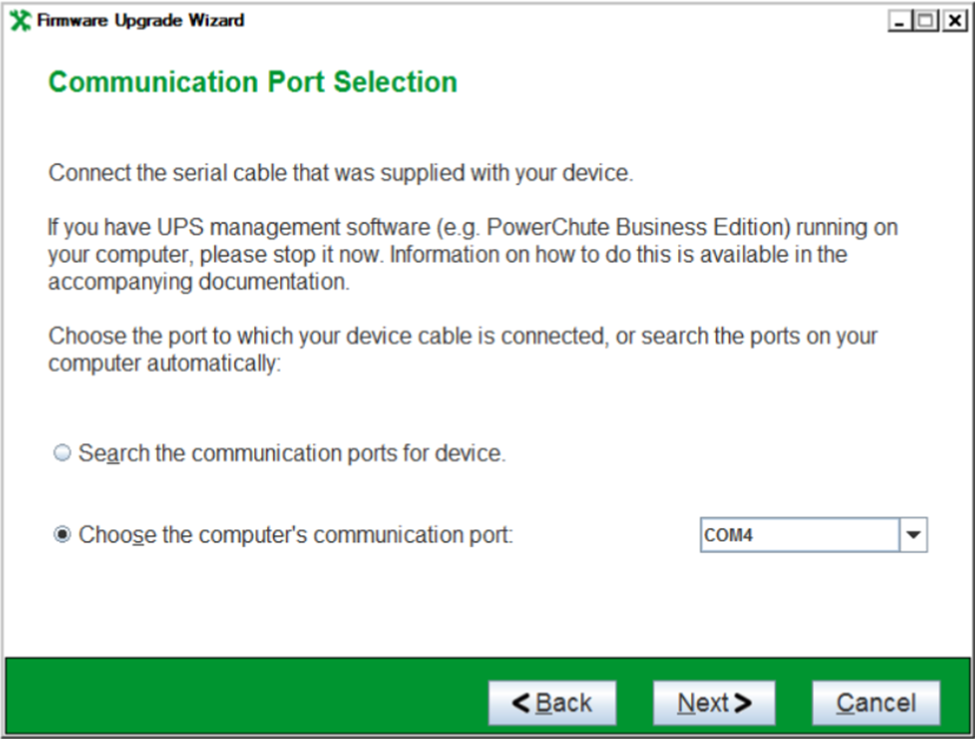
Step 5A:
Step 6A
Step 7A: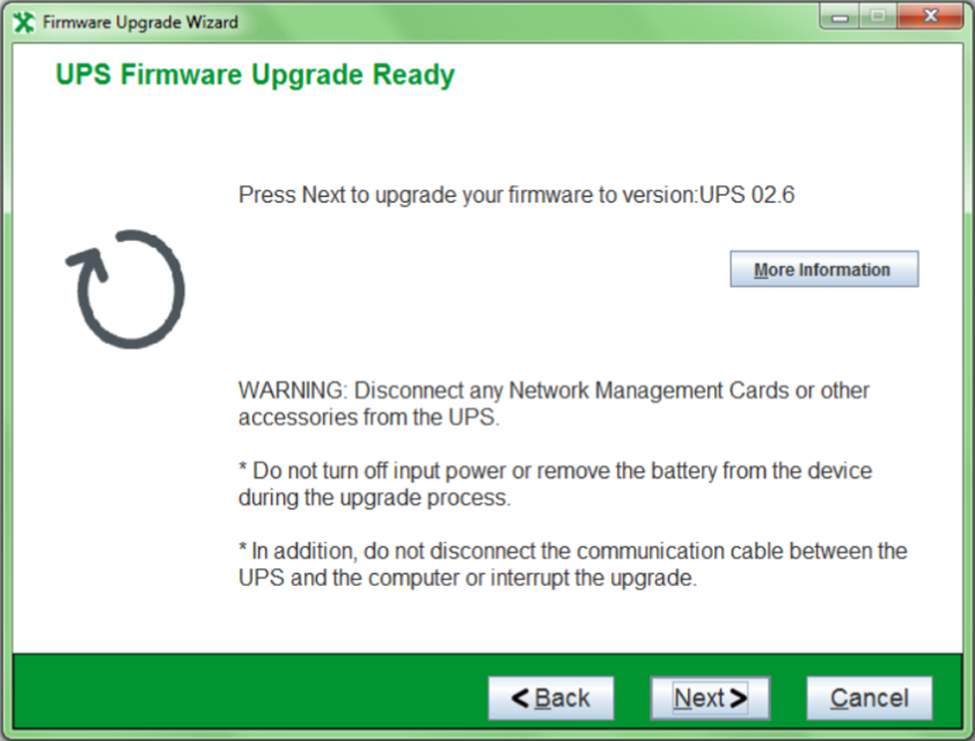
Step 8A: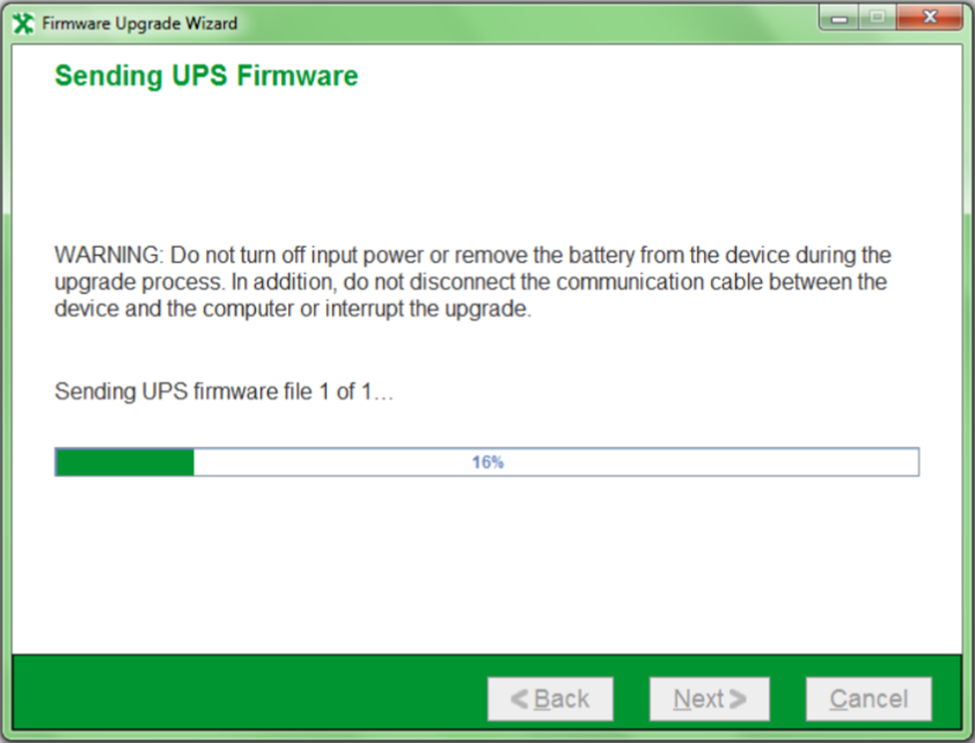
Step 9A: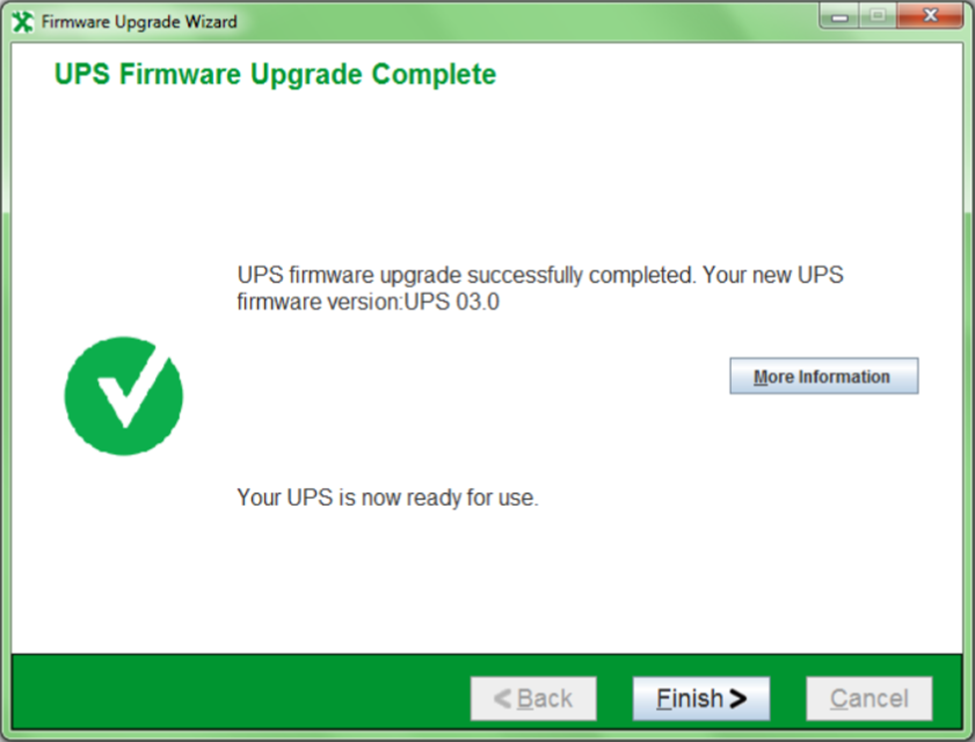
Step 10A
UPS Firmware Update using the web interfance of the Network Management Card (NMC):
NOTE: When performing the UPS firmware update using the NMC web interface, while connected to the web interface over Wi-Fi, a different network, or VPN, a file transfer timeout may occur if an HTTPS connection is used. Refer to FAQ000234317 for alternative methods to update the UPS firmware using the NMC.
Step 1B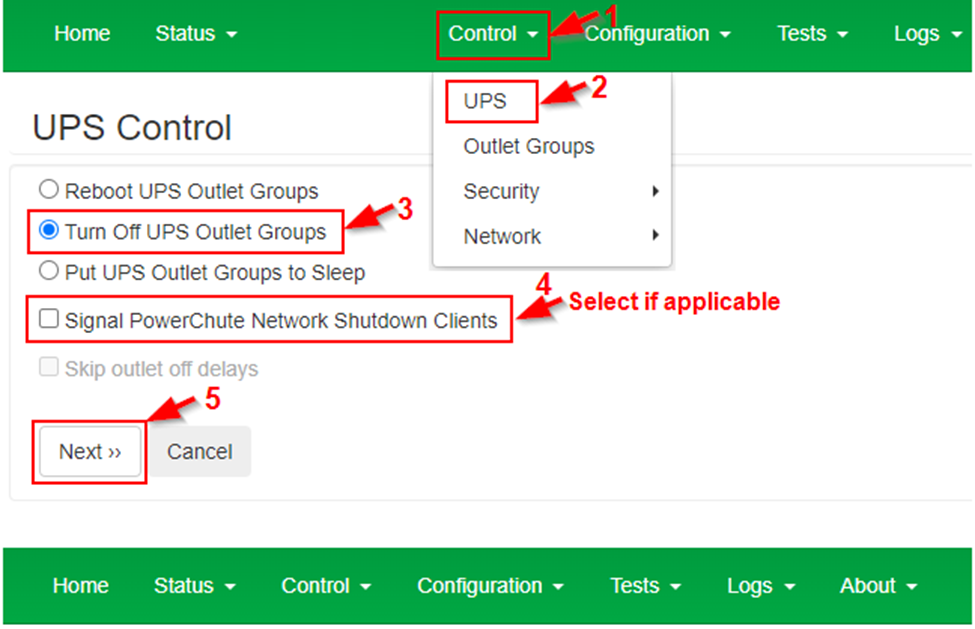
Step 2B

Step 3B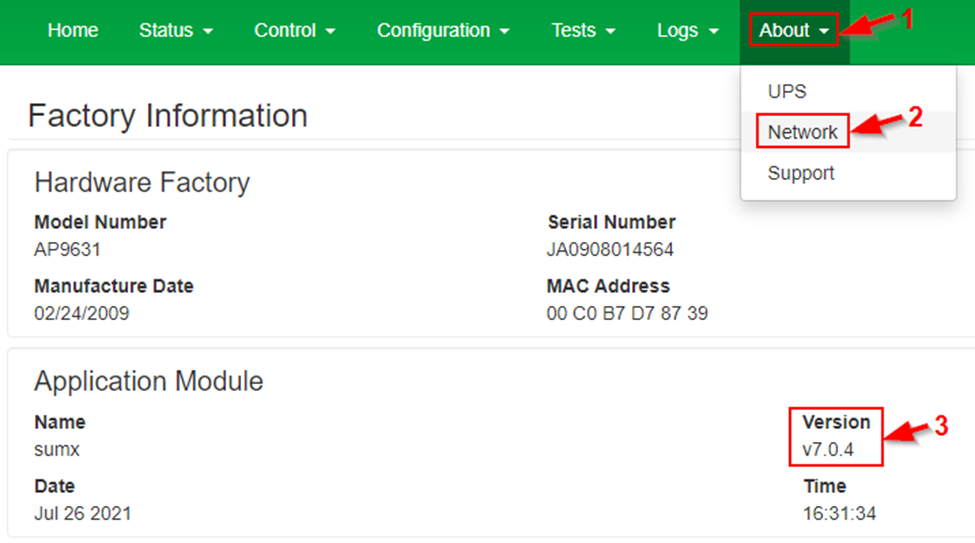
Step 4B
Step 5B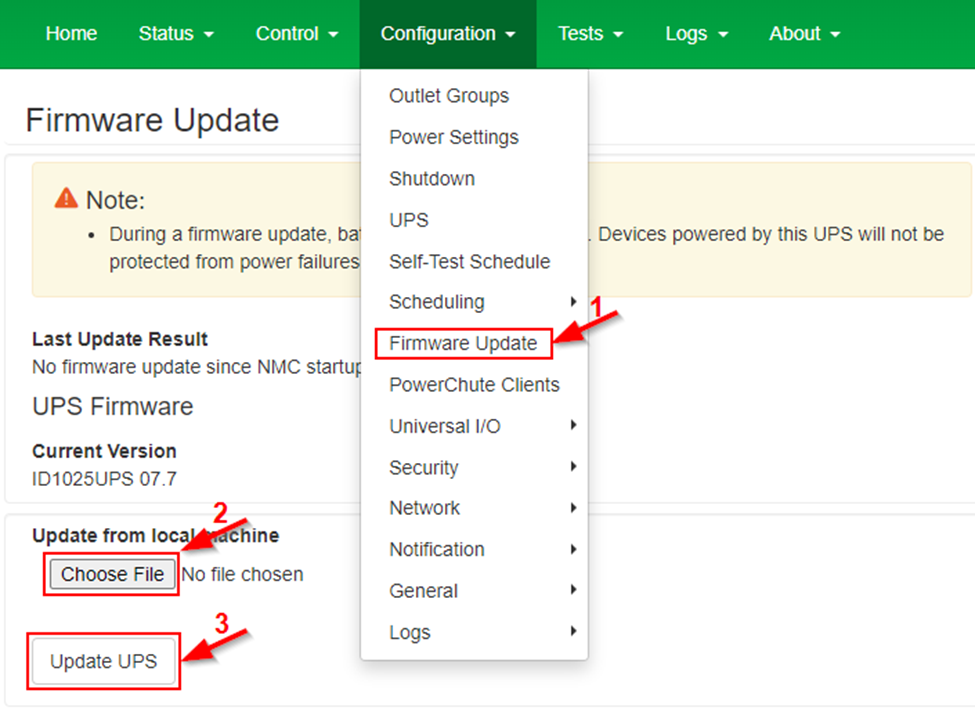
The below window will open after selecting “Update UPS”
The update may take several minutes.
Step 6B
IMPORTANT: after the UPS firmware update is completed, the UPS LCD may display “Communication Error”. Follow the below steps to clear the alarm: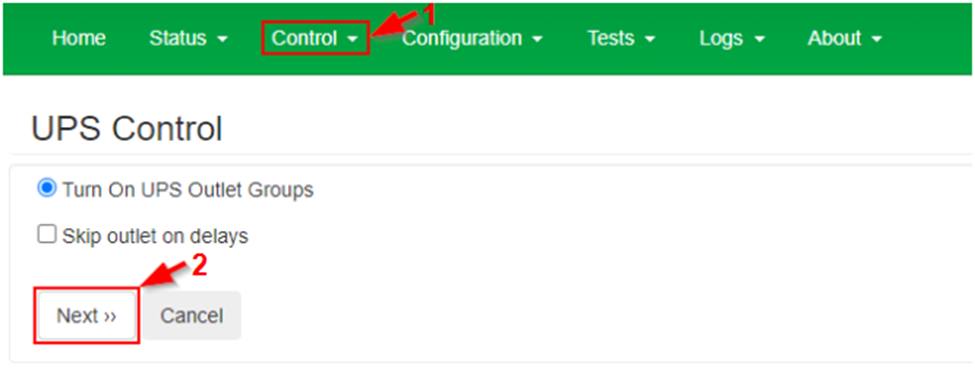
For any issues encountered during the update process or any additional questions, please contact APC Tech Support.
- locally, via Serial connection only using the Firmware Upgrade Wizard v4.3.1.1_SRC application
- remotely via the Network Management Card (NMC)
If a previous version of the Firmware Upgrade Wizard or Firmware Images are installed, delete the old version and download the version attached to this article.
The download links for the necessary files can be found at the end of this document.
Product Line: SRC5KUXI, SRCE6KUXI, SRC6KUXICH, SRC10KUXI, SRC10KUXICH
Environment:
The system requirements for the Firmware Upgrade Wizard v4.3.1.1_SRC are as follows:
Operating systems: 64-bit Microsoft Windows 7, Windows 2016, Windows 8.1, Windows 10
To find the current UPS Firmware version via the UPS LCD display:
The Firmware Upgrade Wizard will detect the current version.
Alternately, from the main menu of the UPS LCD screen, select "About" and scroll down to "UPS Firmware".
To find the current UPS Firmware version via Firmware Upgrade Wizard:
Run the Firmware Upgrade Wizard and it will identify the current firmware version before performing the update.
To find the current UPS ID:
Every Smart-UPS has a unique UPS ID. This can be found in the "About" menu on the UPS LCD screen, or in the NMC web interface.
- Follow the link the video guide on How to locate the UPS ID for APC Smart-UPS
- The same models of UPS may have different UPS IDs depending on when they were produced.
- The final firmware version will be determined by the UPS ID and not the Model Number of the UPS.
- If the UPS ID is not listed in the below table, it does not have an update available.
- The Firmware Upgrade Wizard will select the correct version for the unit you are updating.
| UPS ID | UPS Model | Latest Firmware File | Firmware Version After Update |
|---|---|---|---|
| 1006 | SRC5KUXI | SRC5KUXI_ID_1006_UPS_14-0.enc | UPS 14.0 |
| 1006 | SRCE6KUXI | SRCE6KUXI_ID_1006_UPS_14-1.enc | UPS 14.1 |
| 1006 | SRC6KUXICH | SRC6KUXICH_ID_1006_UPS_14-2.enc | UPS 14.2 |
| 1011 | SRC10KUXI | SRC10KUXI_ID_1011_UPS_14-0.enc | UPS 14.0 |
| 1011 | SRC10KUXICH | SRC10KUXICH_ID_1011_UPS_14-1.enc | UPS 14.1 |
Resolution:
UPS Firmware Update Instructions
IMPORTANT:
- The UPS output must be turned off before the UPS firmware update
- The UPS must be connected to AC input
- The UPS battery must remain connected during the UPS firmware update
- The serial cable, part number 940-8311 or 940-1525, supplied with the UPS must be used
- Open Command Prompt.
- Change the directory to the folder where the downloaded Smart-UPS_Firmware_Upgrade_Wizard_v4.3.1.1_SRC.exe was saved:
- This is typically done using the "cd" command
- For example, if the Smart-UPS_Firmware_Upgrade_Wizard_v4.3.1.1_SRC.exe file was saved to the Downloads folder, the command may look like: "cd C:\Users\Username\Downloads", or "cd Downloads"
- Run the command "certutil -hashfile Smart-UPS_Firmware_Upgrade_Wizard_v4.3.1.1_SRC.exe MD5"
- Compare and verify that the displayed hash value corresponds to c0dee62920c76e617f746a628bc1b0a6.
UPS Firmware Update using the Firmware Upgrade Wizard:
Step 1A:
- Turn off the UPS output, and connect the DB-9 to RJ45 cable part number: 940-8311 or 940-1525, between the UPS and the computer used to update the UPS firmware.
- Download and unzip Smart-UPS_Firmware_Upgrade_Wizard_v4.3.1.1_SRC.exe
- Identify and download the applicable UPS firmware file for the UPS model you are updating from the above table. Save the files on a local drive.
- Double click the extracted FirmwareUpgradeWizard.exe
- Ensure that the Firmware Upgrade Wizard version shown is 4.3.1.1.80643 and select "Next":
Step 3A:
- Select "Next" after checking the "I agree to terms in the License Agreement" checkbox:
Step 4A:
- Choose the computer's communication port the UPS communication cable is connected to, and select "Next":
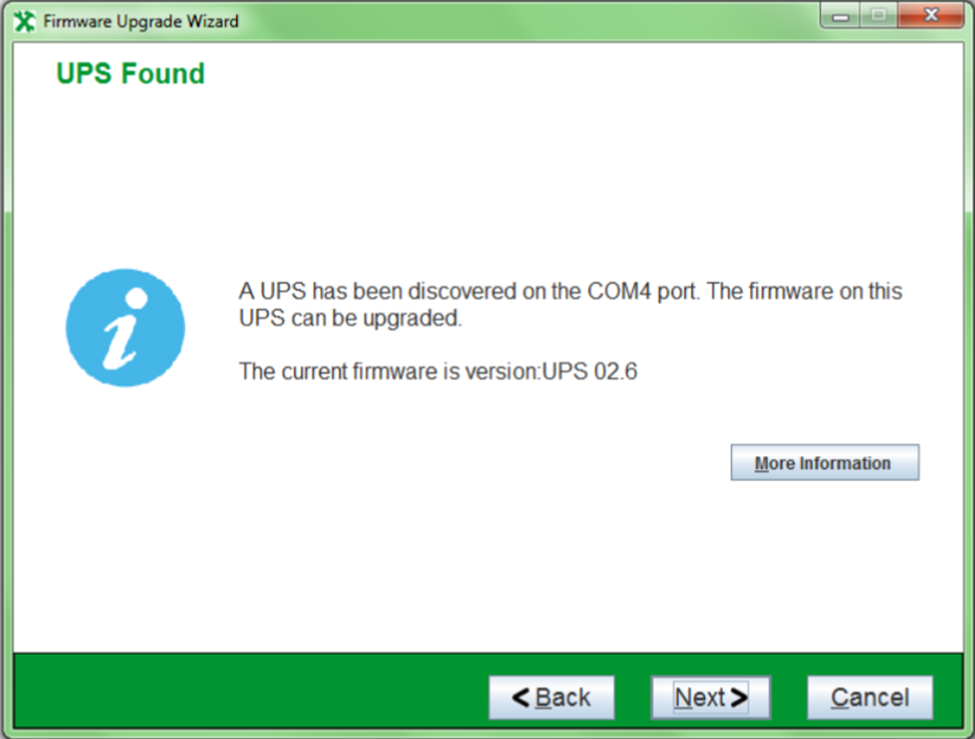
Step 5A:
- The Wizard will check for UPS compatibility.
- Select "Next" once compatibility has been confirmed:
Step 6A
- Select "Browse", then select the UPS firmware file:
- Note: refer to the above table to identify the correct UPS firmware file
Step 7A:
- Select "Next":
Step 8A:
- The UPS firmware is getting updated:
Step 9A:
- Select "Finish" once the firmware update is completed.
Step 10A
- Verify the UPS firmware version in the About menu on the UPS LCD Display
- Turn off and unplug UPS from AC mains supply.
- Disconnect the battery.
- Reconnect the battery, reconnect the UPS to AC mains supply, and turn on the UPS. The UPS will now work normally with the updated firmware.
- You can now turn the UPS output back on.
UPS Firmware Update using the web interfance of the Network Management Card (NMC):
NOTE: When performing the UPS firmware update using the NMC web interface, while connected to the web interface over Wi-Fi, a different network, or VPN, a file transfer timeout may occur if an HTTPS connection is used. Refer to FAQ000234317 for alternative methods to update the UPS firmware using the NMC.
Step 1B
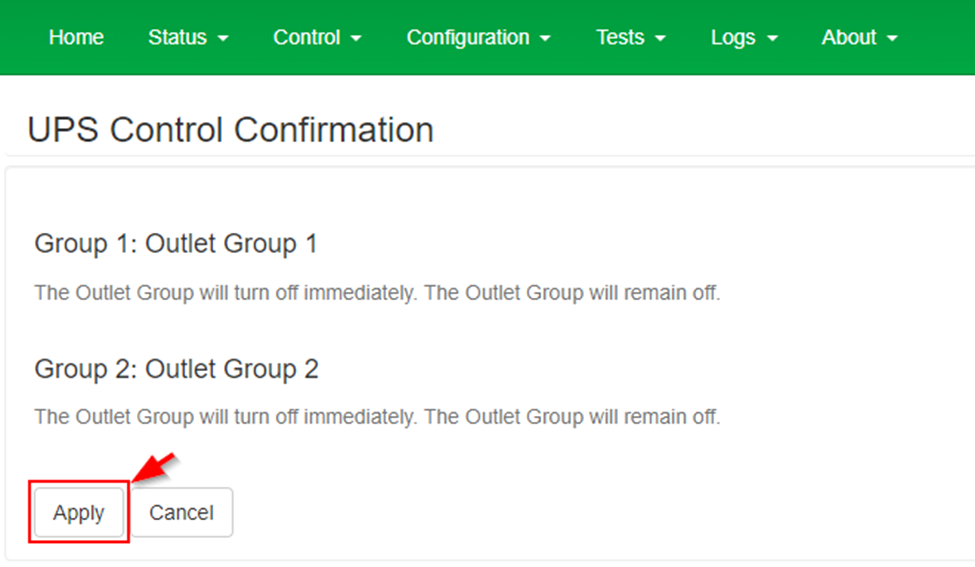
- The UPS output must be turned off before initiating the UPS firmware update. Ensure that network access is not dependent on the UPS for power, when updating via the Network Management Card.
- If network access is dependent on the UPS for power, refer to Step 1A to Step 10A for instructions on updating the UPS firmware using the Firmware Upgrade Wizard.
- If network access is not dependent on the UPS for power, ensure the attached load is correctly shut down before proceeding with turning off the UPS output.
- To turn off the UPS output, from the NMC web interface choose “Control”, then “UPS”:
Step 2B
- Check if you have a Network Management Card 2 running Smart-UPS / Matrix Application, or a Network Management Card 3 running Smart-UPS Application, and ensure there are no active alarms reported.
- Network Management Card 2 running Smart-UPS / Matrix Application:
- Network Management Card 3 running Smart-UPS Application:
Step 3B
- If using Network Management Card 3, go to Step 4B.
- If using Network Management Card 2: Verify the firmware revision of your Network Management Card. From the NMC web interface choose “About”, then “Network”. The firmware must be v.6.4.0 or higher, but we recommend you always run the latest available NMC firmware. To update the firmware of your Network Management Card, refer to FA156047 .
Step 4B
- Download and run Smart-UPS_Firmware_Upgrade_Wizard_v4.3.1.1_SRC.exe to extract the Firmware Files
- After the extraction is complete, you can close the Firmware Upgrade Wizard by pressing Cancel
- To view the extracted firmware files, go to C:\Users\Username\Documents\Smart-UPS_Firmware_Upgrade_Wizard_v4.3.1.1_SRC\FirmwareFiles
- Refer to the table above to identify the correct UPS firmware file for your UPS
Step 5B
- Navigate to the "Configuration" Menu, select "Firmware Update", then use the "Choose File" button to browse for the UPS firmware file downloaded and identified in Step 4B.
- Once the correct UPS firmware file has been selected, click the “Update UPS” button to apply the update.
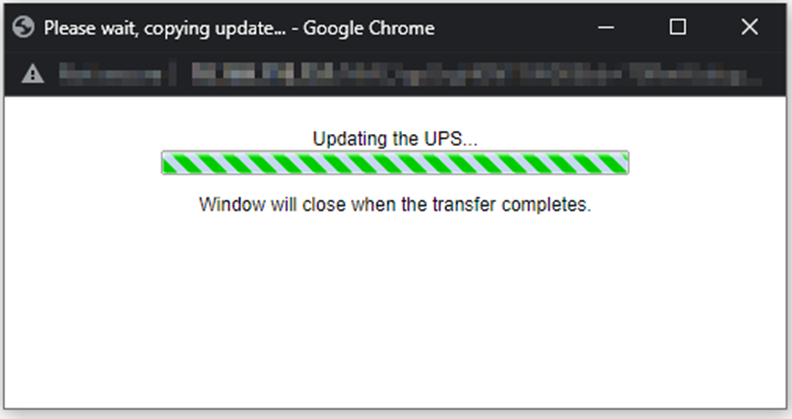
The below window will open after selecting “Update UPS”
The update may take several minutes.
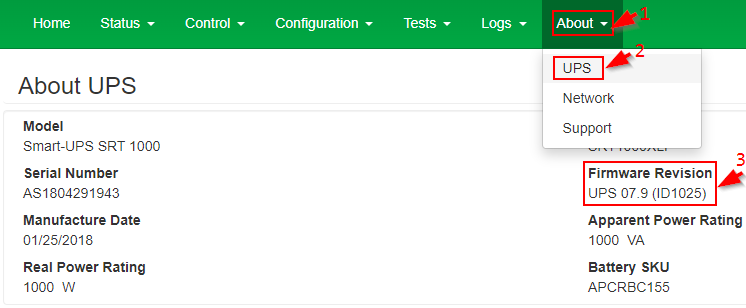
Step 6B
- To verify the UPS firmware version, choose “About”, then “UPS”:
IMPORTANT: after the UPS firmware update is completed, the UPS LCD may display “Communication Error”. Follow the below steps to clear the alarm:
- Turn off and unplug UPS from AC mains supply.
- Disconnect the battery.
- Reconnect the battery, reconnect the UPS to AC mains supply, and turn on the UPS. The UPS will now work normally with the updated firmware.
- You can now turn the UPS output back on. From the NMC web interface choose “Control”, then “UPS”.
- “Skip outlet on delays” may be selected if required to restore power immediately:
For any issues encountered during the update process or any additional questions, please contact APC Tech Support.
Note:
UPS units already having the firmware versions listed in the table below, or later versions, will not have an option to update the UPS firmware through the web interface of the Network Management Card (NMC):
UPS units already having the firmware versions listed in the table below, or later versions, will not have an option to update the UPS firmware through the web interface of the Network Management Card (NMC):
| UPS Model | Firmware Version |
| SRC5KUXI | 14.0 |
| SRCE6KUXI | 14.1 |
| SRC6KUXICH | 14.2 |
| SRC10KUXI | 14.0 |
| SRC10KUXICH | 14.1 |

