
Issue:
PCNS 4.2 Virtual Appliance moved to a new operating system, CentOS 7
Product:
PowerChute Network Shutdown 4.2 Virtual Appliance (CentOS 7)
Cause:
PCNS 4.2 Virtual Appliance has switched to a new Operating System, CentOS 7, due to CentOS 5 already being end of life.
Solution:
Option -1
After deploying the PCNS 4.2 OVA, complete the initial setup and set the root password. Once finished, login as root and enter the command nmtui.

It will switch to the Network Manager TUI. Select Edit a Connection.

Select the Ethernet connection used by PCNS, hit enter or select Edit.
If the ethernet connection is not known open a terminal window and enter ip addr.
On the Edit Connection, there is an option for IPv4 and IPv6 configuration. Select Automatic of the network you need to use and select Manual.
NOTE: When entering the IP address you will need to include the proper subnet mask bits. As an example for a system that requires subnet mask 255.255.252.0 the bits would be 22 so the ip address would be enter as 10.218.44.230/22 You can find a subnet mask calculator on line if the bits are not known.
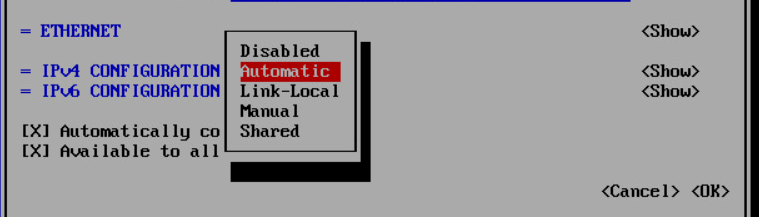
Select Show and hit Enter. Here you can now configure the network settings manually

Once complete, select OK. Go back to the main prompt and enter the command reboot.
Use the ip addr command to verify that the new network settings have been applied.
Option -2
After deploying the PCNS 4.2 OVA, complete the initial setup and set the root password. Once finished, login as root and edit the network file ifcfg-ens192 to add the needed network setting . The file resides in /etc/systemconfig/network-scripts. Prior to editing the file it is recommended a back-up copy is made. The options to edit the file are open the file with vi edit and enter the required information. Install nano text editor on the VM then edit the file using nano. Copy the file to a PC, use a text editor to enter the needed info, save, and copy the file back.
PCNS 4.2 Virtual Appliance moved to a new operating system, CentOS 7
Product:
PowerChute Network Shutdown 4.2 Virtual Appliance (CentOS 7)
Cause:
PCNS 4.2 Virtual Appliance has switched to a new Operating System, CentOS 7, due to CentOS 5 already being end of life.
Solution:
Option -1
After deploying the PCNS 4.2 OVA, complete the initial setup and set the root password. Once finished, login as root and enter the command nmtui.
It will switch to the Network Manager TUI. Select Edit a Connection.
Select the Ethernet connection used by PCNS, hit enter or select Edit.
If the ethernet connection is not known open a terminal window and enter ip addr.
On the Edit Connection, there is an option for IPv4 and IPv6 configuration. Select Automatic of the network you need to use and select Manual.
NOTE: When entering the IP address you will need to include the proper subnet mask bits. As an example for a system that requires subnet mask 255.255.252.0 the bits would be 22 so the ip address would be enter as 10.218.44.230/22 You can find a subnet mask calculator on line if the bits are not known.
Select Show and hit Enter. Here you can now configure the network settings manually
Once complete, select OK. Go back to the main prompt and enter the command reboot.
Use the ip addr command to verify that the new network settings have been applied.
Option -2
After deploying the PCNS 4.2 OVA, complete the initial setup and set the root password. Once finished, login as root and edit the network file ifcfg-ens192 to add the needed network setting . The file resides in /etc/systemconfig/network-scripts. Prior to editing the file it is recommended a back-up copy is made. The options to edit the file are open the file with vi edit and enter the required information. Install nano text editor on the VM then edit the file using nano. Copy the file to a PC, use a text editor to enter the needed info, save, and copy the file back.
Released for:Schneider Electric Philippines
