When trying to update the firmware of your Sepam Series 20, 40, 60, or 80 relay, Technical Support may provide you with a Firmware Update, which is usually delivered in the form of a .ZIP compressed archive.
The firmware update contains at least one Windows executable file, which can have the filename "SepamPatcher.exe," or a name such as "S1000_40_0607_V6.exe."
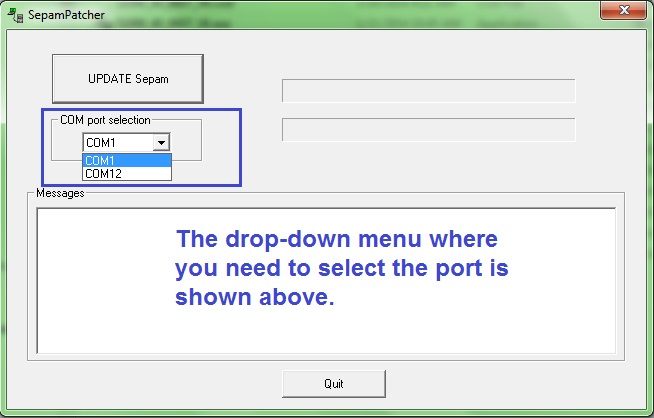
When you run the Sepam Patcher, you need to choose a Communication Port to connect with the Sepam prior to starting the update process.
If you have the combination of an older Sepam relay (delivered before 2014), and also an older computer which has a built-in RS-232 serial port, then typically you will be connect with a serial cable to the round "mini-DIN" port on the front of the Sepam, and you can simply choose COM1 or COM2 for the port in the Sepam Patcher menu. In this case, the Sepam Patcher will usually be able to connect to the Sepam with no problems. This menu is shown in the image below.
However, for newer Sepam relays with mini-USB ports, and also for newer computers which have only USB ports, you may have one of the following situations:
1) you are using a USB to RS-232 converter to connect from your computer's USB port to a Sepam with a round mini-DIN port. In this case, Windows will assign a COM Port number to your USB to RS-232 converter.
2) you are using a USB cable to connect from your computer's USB port to the mini-USB port on a newer Sepam relay (delivered in 2014 or later).
If you using one of these 2 types of hardware configurations for your PC to Sepam connection, then you may encounter problems when running a firmware update. For example, as shown above, your USB to RS-232 converter may be assigned a COM Port number other than COM1 or COM2. If you try to select "COM12" from the menu, as shown in this example, you may find that the Sepam Patcher fails to communicate with the Sepam, even if your Sepam relay is in perfect working order.
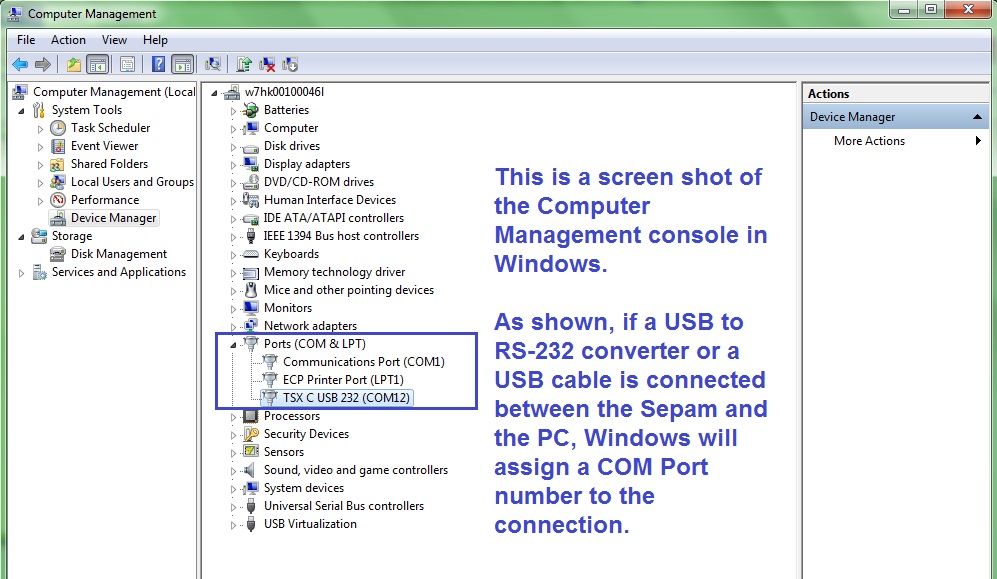
To resolve this issue, you can open the Computer Management console of your Windows machine as shown in the image below. Under the Device Manager, you should be able to see your PC to Sepam connection, and also the COM Port number which has been assigned to it by the operating system.
For older versions of the Sepam Patcher, it may be necessary to use either COM1 or COM2 for the PC to Sepam connection. If you are having trouble connecting to your Sepam with the firmware updater, despite the fact that SFT2841 is able to connect to your relay with no problems, then you may try to force Windows to use a specific COM Port number for your PC to Sepam connection.
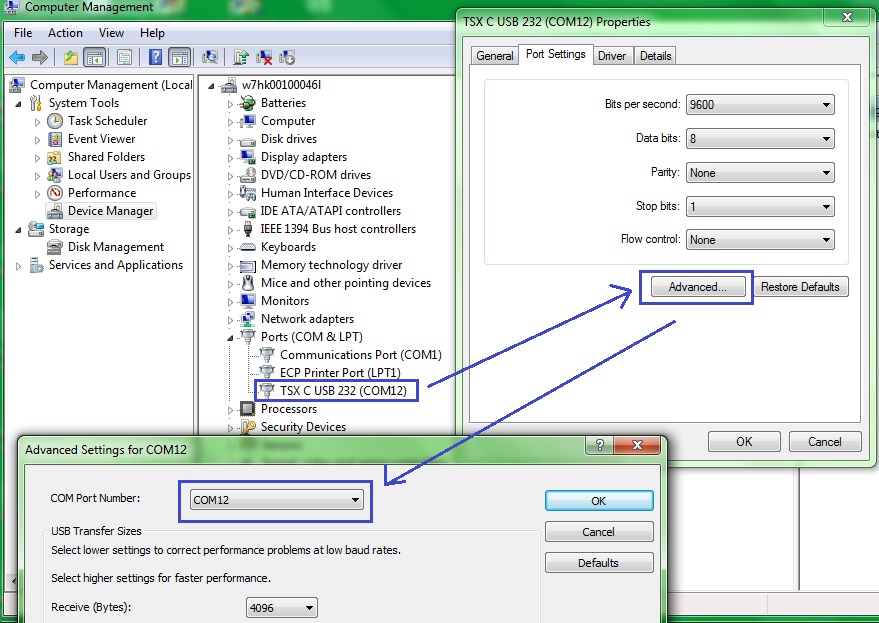
As shown in the image below, you can right-click on the existing connection, open the Advanced Properties, and then use the drop-down menu to use a specific COM Port. We recommend to set this value to either COM1 or COM2. This should allow the Sepam Patcher to connect to your relay.
By setting your USB connection's COM Port Number to COM1 or COM2, you should now be able to perform the firmware update. If you continue to experience problems with any Firmware Update obtained through Schneider Electric Technical Support, please contact Support again for troubleshooting assistance.
AEDL3
The firmware update contains at least one Windows executable file, which can have the filename "SepamPatcher.exe," or a name such as "S1000_40_0607_V6.exe."
When you run the Sepam Patcher, you need to choose a Communication Port to connect with the Sepam prior to starting the update process.
If you have the combination of an older Sepam relay (delivered before 2014), and also an older computer which has a built-in RS-232 serial port, then typically you will be connect with a serial cable to the round "mini-DIN" port on the front of the Sepam, and you can simply choose COM1 or COM2 for the port in the Sepam Patcher menu. In this case, the Sepam Patcher will usually be able to connect to the Sepam with no problems. This menu is shown in the image below.
However, for newer Sepam relays with mini-USB ports, and also for newer computers which have only USB ports, you may have one of the following situations:
1) you are using a USB to RS-232 converter to connect from your computer's USB port to a Sepam with a round mini-DIN port. In this case, Windows will assign a COM Port number to your USB to RS-232 converter.
2) you are using a USB cable to connect from your computer's USB port to the mini-USB port on a newer Sepam relay (delivered in 2014 or later).
If you using one of these 2 types of hardware configurations for your PC to Sepam connection, then you may encounter problems when running a firmware update. For example, as shown above, your USB to RS-232 converter may be assigned a COM Port number other than COM1 or COM2. If you try to select "COM12" from the menu, as shown in this example, you may find that the Sepam Patcher fails to communicate with the Sepam, even if your Sepam relay is in perfect working order.
To resolve this issue, you can open the Computer Management console of your Windows machine as shown in the image below. Under the Device Manager, you should be able to see your PC to Sepam connection, and also the COM Port number which has been assigned to it by the operating system.
For older versions of the Sepam Patcher, it may be necessary to use either COM1 or COM2 for the PC to Sepam connection. If you are having trouble connecting to your Sepam with the firmware updater, despite the fact that SFT2841 is able to connect to your relay with no problems, then you may try to force Windows to use a specific COM Port number for your PC to Sepam connection.
As shown in the image below, you can right-click on the existing connection, open the Advanced Properties, and then use the drop-down menu to use a specific COM Port. We recommend to set this value to either COM1 or COM2. This should allow the Sepam Patcher to connect to your relay.
By setting your USB connection's COM Port Number to COM1 or COM2, you should now be able to perform the firmware update. If you continue to experience problems with any Firmware Update obtained through Schneider Electric Technical Support, please contact Support again for troubleshooting assistance.
AEDL3
게시 대상: 슈나이더 일렉트릭 Korea
