


ClearSCADA: ViewX upgrade in ClearSCADA 2017
Below are the steps to install or upgrade ViewX only in ClearSCADA 2017. These steps would typically be followed when installing/upgrading ViewX on a remote PC.
Run the installer and select 'Install ClearSCADA'.

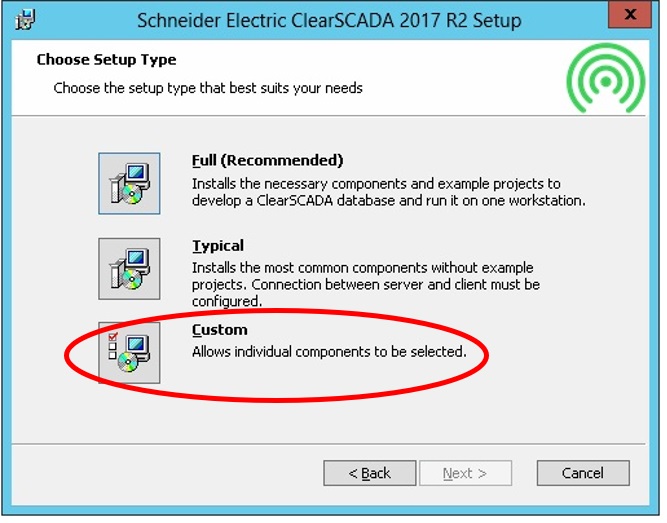
Follow the Wizard until it presents you with three choices: Full, Typical & Custom. Choose the 'Custom' option.
In order to run ViewX on a remote PC you must install the following modules:

Finish running through the Wizard to complete the ViewX installation.
Once ViewX is installed you will need to license it. The licensing of ViewX is covered in Knowledge Base article FA299727 - Server and Client Licenses in ClearSCADA
https://www.schneider-electric.ca/en/faqs/FA299727/
Run the installer and select 'Install ClearSCADA'.
Follow the Wizard until it presents you with three choices: Full, Typical & Custom. Choose the 'Custom' option.
In order to run ViewX on a remote PC you must install the following modules:
- ViewX client
- Data Access
- Server Management Utilities
Finish running through the Wizard to complete the ViewX installation.
Once ViewX is installed you will need to license it. The licensing of ViewX is covered in Knowledge Base article FA299727 - Server and Client Licenses in ClearSCADA
https://www.schneider-electric.ca/en/faqs/FA299727/
Released for: Schneider Electric Canada

Need help?
Product Selector
Quickly and easily find the right products and accessories for your applications.
Get a Quote
Start your sales inquiry online and en expert will connect with you.
Where to buy?
Easily find the nearest Schneider Electric distributor in your location.
Help Center
Find support resources for all your needs, in one place.